

How To Repair Knife Cuts In Vinyl Floors
Repairing Vinyl Floor
Set up a hole, tear or scratch in four simple steps.
![]() Time
Time
An 60 minutes or less
![]() Complexity
Complexity
Beginner
![]() Cost
Cost
Less than $xx
Introduction
You can ready small tears, burns and gouges in a vinyl flooring in less than 30 minutes. An inexpensive kit contains all the materials you lot need to make the ugly blemish disappear.
Tools Required
Materials Required
- Vinyl repair kit
Project footstep-by-step (4)
Step 1
Vinyl floor scratch repair how to steps: Purchase the kit and prep the surface
Cut away loose vinyl
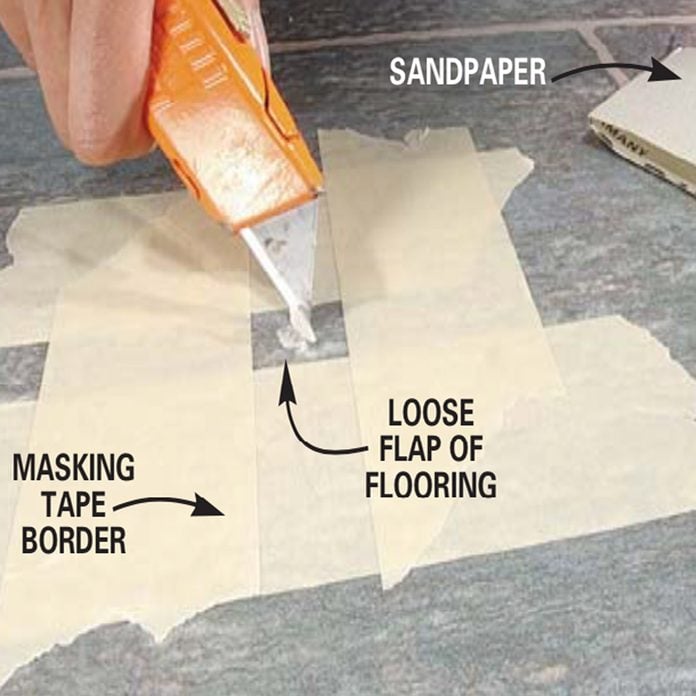
Wondering how to remove scratches from vinyl flooring? Record effectually the damage. Cut out whatsoever loose fragments with a utility knife. Make clean dust or clay from inside the damaged expanse with a damp rag, and smooth rough edges with the enclosed sandpaper.
The easy maintenance of vinyl and linoleum flooring makes it platonic for bathrooms, kitchens and other busy areas. However, heavy, hot or abrupt objects tin can impairment this tough material, and nothing looks worse in the center of the flooring than a conspicuous blemish. The Vinyl Floor Repair Kit allows you lot to repair those unsightly burns, cuts and gouges in your vinyl or linoleum flooring. It'll disguise imperfections upwards to the size of a quarter. The kit is available at hardware stores or online. Prepare the surface for patching as shown in Photograph ane. Keep the tape i/ii in. dorsum so the repair adhesives don't glue information technology to the flooring.
How to Install Luxury Vinyl Plank Flooring
Step 2
Mix and apply paint
Mix paint to match the vinyl

Mix the paint to match the floor color, and paint the within surface and edges of the damaged expanse. Clean off any paint that gets on the surrounding vinyl surface. Let the paint dry for 15 minutes, or speed upward the drying time with a hair dryer on low heat. Mixing the special paint to lucifer your flooring color is the trickiest office of the ready. The included color-matching guide will help y'all decide basic colors, but a closer match volition require a piddling trial and error. An exact color friction match may non be possible, merely if it's shut, it'll exist nigh indistinguishable at normal viewing distances.
Bank check the colour mix by dabbing test samples on a piece of articulate packing tape laid on the floor. Add together small amounts of colour to the mix until yous find a close match. Dark colors will lighten slightly and light colors will darken slightly after the hole is filled.
Luxury Vinyl Tile Installation
![]()
Step 3
Add together filler and flooring bond
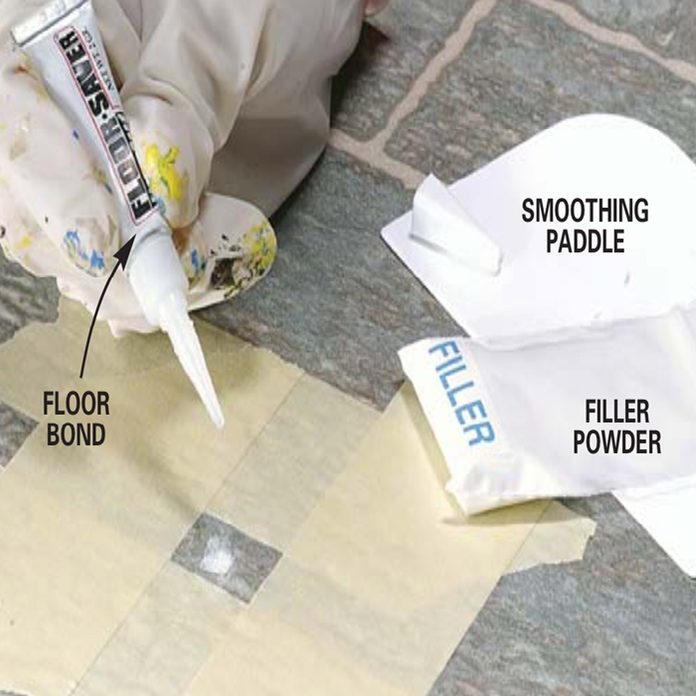
Pour filler powder into the hole and level it off with the enclosed smoothing paddle. Concord the floor bond right over the filler pulverization. Slowly baste the bond onto the filler powder until the powder is saturated (it'll only take three or four drops to cover a dime-size area). Let the compound harden for xv minutes. The filler and floor bond level the hole flush with the remainder of the floor.
Install Vinyl Flooring in a Laundry Room
Step 4
Sand smooth and end
Apply acrylic finish

Brush the clear acrylic end over the repair, and allow 2 hours' drying time before walking on the expanse. If the surface appears rough after the bond dries, lightly sand it smooth with the enclosed sandpaper (be conscientious not to scratch the surrounding floor surface). Protect the repair with articulate acrylic finish.
Repair and Reglue Sheet Vinyl Floors
Originally Published: September thirty, 2022

Source: https://www.familyhandyman.com/project/repairing-vinyl-flooring/
Posted by: lightnerrater1974.blogspot.com
0 Response to "How To Repair Knife Cuts In Vinyl Floors"
Post a Comment